 This is a great way to trade some elbow grease for cash or even some beer ingredients by saving money on your brewing equipment.
This first tip for brewing on a budget is how to make your own brew kettle out of a used keg shell for $15-40 depending on the keg deal you can find. This will allow you to brew more than 10 gal batches, which is much more than any home brewer needs and can easily be converted to a heated mash ton later or used as a hot water tank in all grain brewing. Now there are differing thoughts out there between steel and aluminum for your brew kettle. From my experience it doesn’t really matter, especially if you are on a tight budget. This is a quick and easy way that with a few power tools you can save $50 to $150 depending on what new shiny pot you aren’t buying. Home Brewing Tip: You need to have some southern engineering in your blood because to get the valve fitting right and leak free you have use some trial and error.
To start off to do this you will need or need to have or borrow the following tools.
- Drill
- Dremel tool
- Either a cutting torch, abrasive die grinder or a Sawz-all (we have to cut the top off the keg).
You will also need a keg shell (the normal half barrel, not the skinny or the short and stubby shells). You can get these off of craigslist for cheap or if you’re like me I happen to have one lying around that I forgot to return for the refund years ago. Either way this is the big purchase. Other than this you will need a regular ball valve with one end to a ¼ or larger NPT hose fitting, and the other end should be threaded any size, two large thick plumbing O-rings that are tight around the male threaded end of the ball valve; and a flat nut that fits on the male threads of the ball valve. Don’t go more than ½ inch ID for the ball valve or it may get more expensive All these can be found at a local hardware store.
Now down to the meat.
- You need to cut the top off of the keg shell. Make sure there is no pressure in the shell!! Otherwise you will not be happy about what happens. After emptying everything with a beer tap for the keg, use a drill to make a small pilot hole to give your saw or abrasive cutter a starting point (still do this if you are using a torch to relieve any residual pressure). I recommend cutting on the top about 2 in from the side in a nice uniform circle. When done pull it out and save it if you want to make a lid for your kettle later. To make the lid, cut the stem off and bolt on three washers that stick out a half inch or so and voila, you have a lid. Also depending on your method you may want to round the edges with a file to avoid cutting yourself on a sharp edge.
- Our second and last power tool step will be a small hole the same size as the threaded end of our ball valve. This hole should be made as near as possible to the bottom. The way kegs are made makes it impossible to get it all the way to the bottom. As long as your hole is only going through the side straight into the keg and not the bottom rim of the keg this is perfect. To be sure you can see a weld line on the inside of the bottom. Make sure you are above that. This will make so you have to tip the kettle to get the last little bit out but that happens with most kettles. Use the Dremel to widen it to size as many drill bits owned by a normal person are not big enough. Grind a little and check the fit because you want the threads to barely fit you want it so tight that you have to thread it in, that is perfect.
- When your hole is cut, take your ball valve with one o-ring over the threads and fit it in the “perfectly sized hole” you have just cut. Put one of your O-rings on the inside of the keg over the threads of your ball valve. A little Teflon tape on the threads of the valve doesn’t hurt but mine didn’t need it. Now with some wrenches, pliers and brute strength, tighten down the flat nut on the inside of the keg until the O-rings are smashed up against the keg walls. It’s a rounded surface so this is where the thick washers come in. this is the hardest part because you really have to get it tight to make a good seal. Make sure your ball valve it facing the way you want it.
- Check for leaks! Mine has always dripped a little but (maybe a teaspoon over a few hours) but it’s nothing to worry about. Make sure to clean it thoroughly as well. There is nothing worse than metal shaving in your beer.
Final Thoughts
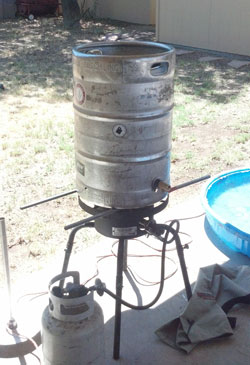
In my case I had a keg and with the hardware I spent $15 on my 15 gallon brew kettle. Even if you have to buy the keg, comparing this to a $40 or $50 small kettle that only holds a 2 or 2-1/2 gal batch, it was well worth the elbow grease. Look up the cost of 15 gallons posts and you will be more than happy to spend $60 on this project.
But there is more! When you really get into beer brewing and you need a large mash ton, you can use this kettle with a false bottom. You can also make three and have your whole system. You will also need a high pressure outdoor propane burner to run your keggle. This isn’t the best kettle build out there but it’s among the easiest and cheapest. Happy brewing!

FYI- when you leave a deposit for a keg, you are not, in fact purchasing it. Please return it to its owner. Note: Some local breweries will sell off their damaged kegs. You only need one that hold water and your conscience will be clear 🙂
Yes, you are correct. But most any kegs I have found do not have any indication to weather or not the were purchased legally or not. But in reality you are hurting local breweries if you use there Kegs. Thats why you use Coors or Budweiser.. just kidding. But yes you should do what you can to make sure your kegs aren’t stolen.