
Making yeast starters is one of the easiest steps a beginning brewer can take to start improving on the quality of their beer.
If you’re wondering why you need to make a starter, pay close attention to the following equation; Wort + Yeast = Beer, Wort + More Yeast = Better Beer.
Without getting too bogged down with numbers and science, most of the yeast you’ll find at a homebrew shop is sold in packages with somewhere around 100 billion yeast cells. This sounds like a lot, but it’s not always enough, especially for beers with a higher OG or beers that are fermented at colder temperatures, and that’s why we make a starter.
A properly made yeast starter can easily double the amount of yeast you pitch into your wort, giving you healthier, less-stressed yeast that is eager to get down to business turning all those tasty sugars into alcohol. This is a really easy process, so don’t shy away from it. A yeast starter is essentially just a mini wort you make a day or two before your brew day. This allows the yeast time to reproduce, so by the time you get around to pitching, it can get right to work.
Lets Get Started
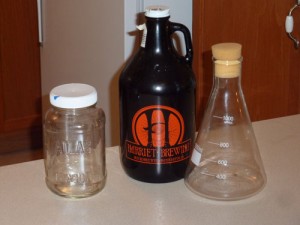 The first thing to do is find some sort of container to hold your starter. An Erlenmeyer flask is the Rolls Royce of this category for reasons I’ll explain below, but ultimately, anything glass, smallish, and with a narrow mouth will do. You do want glass though, because plastic tends to scratch and those scratch marks are notoriously difficult to sanitize. I have it on good authority that any spare growlers you have floating around will do nicely. Take your flask/growler/jug, clean and sanitize it, and set it aside.
Now you want to mix up your mini wort. Your target gravity here is 1.040, because that gives yeast ideal conditions in which to reproduce. More is not better here, so don’t get too much higher than 1.040 or your yeast will suffer.
There is some confusion in the brewing community about the ratios you need to get the correct gravity; John Palmer says you want 1 pint of water and 1/2 cup of DME (dry malt extract). White Labs says you want 2 pints of water and 1/2 cup of DME. Both say this will get you a starter that reads 1.040. That sucks because these two are otherwise incredibly trustworthy sources who in this case are fundamentally at odds with each other. We can safely chalk this up to using inappropriate measurements. My DME could have a completely different density than your DME, so it should be measured by weight, not volume. You’ll want to use 3oz of DME for every 1000ml of water, and you should use at least 1000ml of water. Use a kitchen scale to get the measurements right, it’s important.
You might be wondering, do I need to use DME or will any other sugar do? After all, yeast doesn’t care does it? It does. Trust me on this. Your yeast will not perform well after feasting on a diet of pure sucrose. Not having any DME in the house is a lousy excuse. Go buy some. It’s cheap. It’s useful stuff. You’ll use it all the time. It doesn’t really matter what particular DME you get, but if you’re making a really big starter, make sure you use an extract that fits in with your beer’s recipe. If you’re already using DME in your recipe, it’s perfectly acceptable to just steal some of that, after all, you’ll end up putting it back in the batch anyway.
So now you mix up your water/malt solution in a small sauce pan, and boil it for 15 minutes to get it sterile. From this point on you need to be thinking carefully about contamination so be mindful of what you’re doing. After the boil, stick the pan in an ice water bath to chill it. Really you could chill it any way you like; an ice water bath is easiest, but I won’t hold it against you if you want to get more use out of your ridiculously expensive Therminator.
I didn’t mention this above, but all of this should take place after you’ve gotten your yeast ready to go, whether through pack-smacking or rehydrating or whatever. Once the starter is chilled down to a yeast-friendly temperature, go ahead and pour it in your glass container and mix in your yeast, staying careful to avoid contamination.
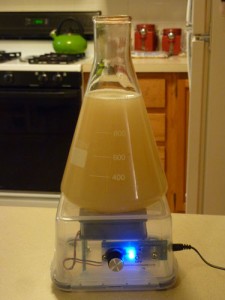 The last thing you need to do is oxygenate the yeast, and that’s why you want an Erlenmeyer flask, and that’s also why you want a stir plate. If you have a stir plate, just put your flask on it, plug that sucker in, and walk away. It’s like magic. You should also be able to use most other small, flat bottomed containers, but things like growlers with ridges or a concave bottom won’t work. This type of pseudo-lab work is where an Erlenmeyer flask shines, and they’re not very expensive, so go get one. For the stir-plateless, just shake your jar around for a little while, being careful not to slop anything over the sides, you’ll want to do this a little bit every day. Stir plates work better, but any oxygenation here is good oxygenation, so get to shaking.
When you’re not actively shaking your starter, set it in an out of the way place that doesn’t get direct sunlight and doesn’t fluctuate much in temperature. You want to encourage some gas exchange, so leave the cap off your container. Homebrew shops sell little foam stoppers you can use that allow airflow while blocking any crud that might fall in. Failing that, you can always just use a loose fitting foil cap. Whatever works.
All you have to do now is leave your yeast alone for a couple of days. You should start to see some yeast activity within 24 hours. At this point you can safely pitch anytime. I’ve used starters after only ten hours, and I’ve waited for three days. Just don’t wait too long or your yeast will go dormant, ruining the entire point of making a starter in the first place.
That’s it. With good yeast starters you should start to see beers that are more fully attenuated and with fewer of the nasty fermentation by-products you didn’t want in the first place.
Go forth and propagate.
')}
I may have missed it, but I think you forgot one important item. If you’re going to use a stir plate, you will need a stir bar in the glass vessel. I stir plate will not stir anything on its own. It’s the coupling of the spinning magnet in the stir plate, and the magnet in the stir bar, which creates circulation.
Sincerely,
A professional chemist
“A stir plate…”
You are correct. Just got overlooked. Will have to make an update to the post.